Warehouse Transfers
Items > Warehouse Transfers
Warehouse Transfers are used to order product from other warehouses in the district. Warehouse transfers can be created manually and are created automatically via the Ordering Guide if approval is required via the building or item.
Warehouse Transfers Screen
-
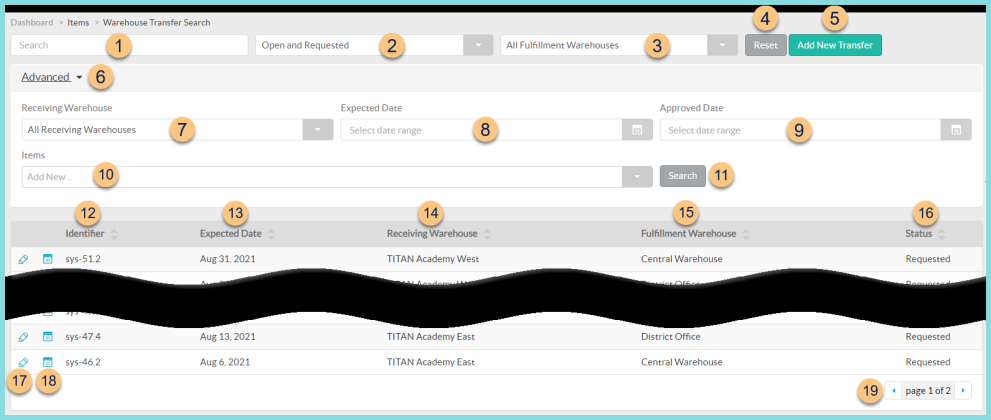
Search - search by warehouse
-
Open and Requested - filter by Warehouse Transfer status (All Statuses, Open and Requested, Approved, Closed, Completed, Open, Requested, Shipping, Short Received)
-
All Fulfillment Warehouses - filter by the warehouse that will be fulfilling the transfer
-
Reset - click to reset search parameters
-
Add New Transfer - click to create a warehouse transfer
-
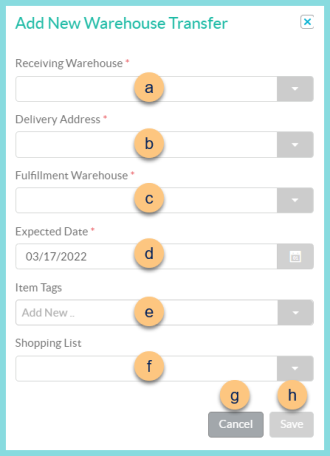
Receiving Warehouse - select the warehouse that is receiving the transfer
-
Delivery Address - choose the Receiving Warehouse's delivery address
-
Fulfillment Warehouse - select the warehouse that is fulfilling the transfer. Note: This will be pre-poulated with the Receiving Warehouse's selected Central Warehouse if applicable.
-
Expected Date - select the expected date
-
Item Tags - select item tags to pre-populate the transfer with tagged items
-
Shopping List - select a shopping list to pre-populate the transfer with items on that list
-
Cancel - click to return to the previous screen without saving changes
-
Save - click to be redirected to the individual transfer screen
-
Advanced - click to open additional filters
-
Receiving Warehouse - filter by the warehouse that will be receiving the transfer
-
Expected Date - filter by expected date range
-
Approved Date - filter by approved date range
Inventory Route (not pictured) - filter by inventory route(s) -
Items - filter by inventory item(s) included on the transfer
-
Search - click to search by advanced filters
-
Identifier - click to sort by transfer identifier
-
Expected Date - click to sort by transfer Expected Date
-
Receiving Warehouse - click to sort by receiving warehouse
-
Fulfillment Warehouse - click to sort by fulfillment warehouse
-
Status - click to sort by transfer status
-
Pencil - click to be redirected to the individual transfer screen
-
Calendar - hover to view transfer history
-
< > - click to scroll through pages
Individual Warehouse Transfer
-
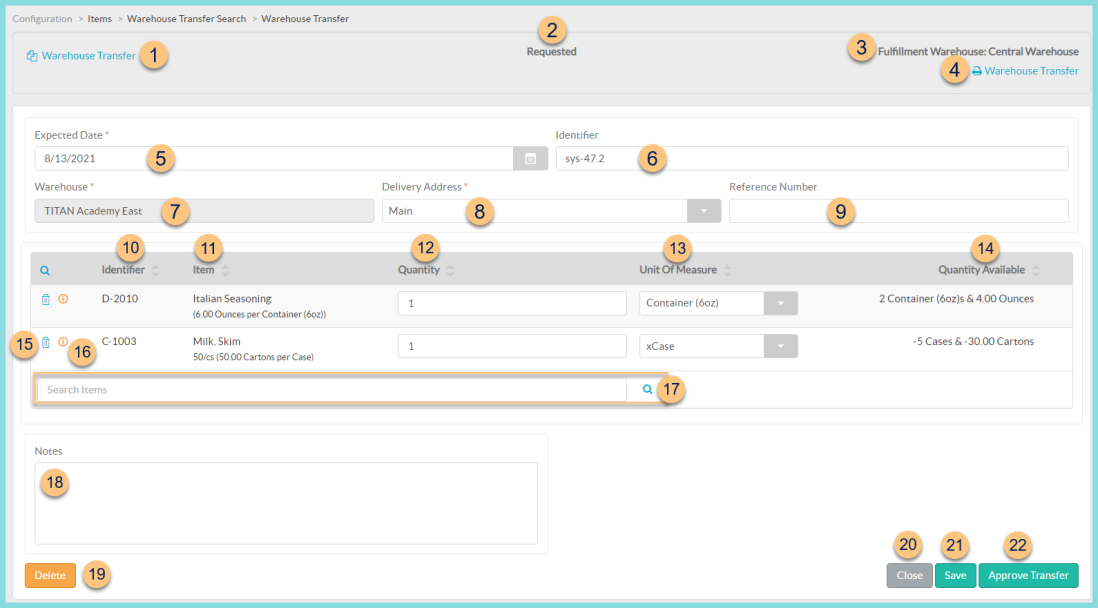
Copy Warehouse Transfer - click to create a duplicate of the warehouse transfer
-
Status - notice the transfer status
-
Fulfillment Warehouse - notice the warehouse that will be delivering the product
-
Print Warehouse Transfer - click to request a warehouse transfer report
-
Expected Date - change expected date of receipt if needed
-
Identifier - change transfer identifier if needed
-
Warehouse -notice the warehouse that will be receiving the product
-
Delivery Address - change the delivery address if needed
-
Reference Number - enter a reference number for documentation purposes if needed
-
Identifier - click to sort by item identifier
-
Item - click to sort by item. Notice the Item Name, Description, and # of base units per preferred unit of measure.
-
Quantity - click to sort by quantity. Enter the requested quantity. Note: this is pre-populated if the transfer originated from an Ordering Guide.
-
Unit of Measure - click to sort by unit of measure. Select the inventory unit of measure. Note: this is pre-populated if the transfer originated from an Ordering Guide.
-
Quantity Available - click to sort by the current total quantity of the fulfillment warehouse
-
Trash Can - click to remove the item from the transfer
-
(i) - notice the indication that this item requires approval by someone with approval rights
-
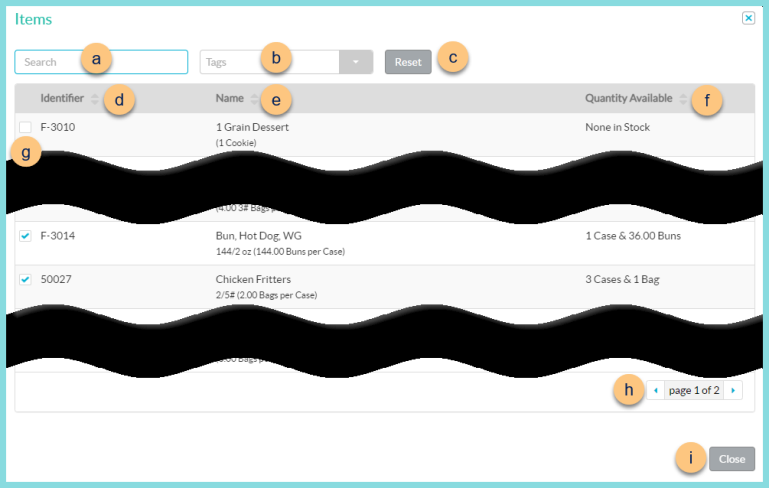
Search Items - search for items or click the Magnifying Glass to add inventory items to the transfer for which the receiving warehouse has rights.
-
Search - search for inventory items permitted to be used at the selected warehouse
-
Tags - filter by item tags
-
Reset - click to reset filters
-
Identifier - click to sort by identifier
-
Name - click to sort by name
-
Quantity Available - click to sort by the total on hand quantity of the fulfillment warehouse
-
Checkbox - check to add item to adjustment
-
< > - click to scroll through pages
-
Close - click to return to the adjustment screen with added items
-
Notes - enter notes as needed for documentation
-
Delete - click to delete the warehouse transfer
-
Close - click to return to the Warehouse Transfers screen
-
Save - click to save the transfer and return to work on it later
Request Transfer (not pictured) - click to request the transfer -
Approve Transfer (only available for users with security rights to approve) - click to approve the transfer if approval is required via the building or item
After requesting or approving if needed, the warehouse transfer will generate a corresponding Item Fulfillment.